 Soonqian
How To Use Strapping Machine
The operation logic of the baler cannot be separated from four basic actions: wrap the goods with a baling tape, tighten it, then fix both ends of the tape, and finally cut off the excess part. Whether you are holding the most basic manual tools or a semi-automatic machine, if you make these steps standard, you can ensure that your goods are both strong and safe.
There are several key points that need to be made clear first:
- Safety measures must be in place.
- The machine must wait for it to warm up.
- The head of the packing belt must be inserted in the right place.
Using A Manual Handheld Strapping Tool
If you are using hand tools, you need to have 3 things on hand: a Tensioner, a Biter (Sealer/Crimper), and a matching metal packing buckle. The advantage of this set of things is that it is easy to carry and is very suitable for jobs where the amount of packing is not large or the packing place is not fixed.
Safety First
Before starting work, my personal habit is to go through the safety problem 1-2 times. Protective gloves should be worn at any time, otherwise the hand is easily scratched by the packing belt, and the goggles are also necessary, mainly to prevent the accidental rebound of the packing belt from hurting the eyes.
Step 1: Winding Packing Belt
Grab your packing tape and wrap the entire bundle around the goods. Make sure the tape is flat and not twisted into a twist. Let the two ends of the belt overlap, leaving more than ten centimeters of margin, so that the back is easy to operate. The usual habit is to put this end close to your body on the bottom and press the other end on top.
Step 2: Tighten With A Tensioner
Pinch the handle of the tensioner and you will see its presser foot lift up. Tuck the two overlapping pieces of packing tape together—the lower tape passes under the presser foot, and the upper tape passes through the mechanism of the cutter and the tightening wheel (ratchet). Release the handle and the strap is clamped. Then you can pull the ratchet handle back and forth to tighten the strap. According to my experience, this tension needs to be grasped by yourself and continue to operate until you feel the tightness is appropriate. The key is to tie it tightly, but not so tight as to break the packing box of the goods.
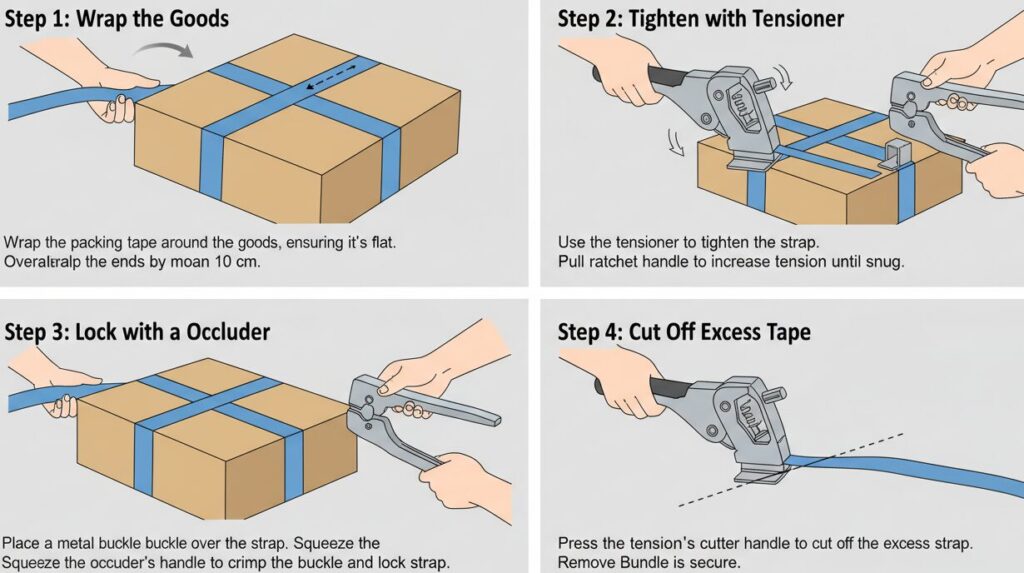
Step 3: Lock With The Occluder
After tightening the packing belt, take a metal packing buckle and put it on the two overlapping straps, and push it in the direction of the tensioner as much as possible. Then open the jaws of the occluder and firmly clip on the metal buckle. Next, squeeze the handle of the biter firmly to press the metal buckle out of the dent. This action can firmly lock the two layers of packing tape together.
Step 4: Cut Off The Excess Tape
After the packing button is locked, the last step is to cut the tape. It’s very simple. As long as you press the handle of the tensioner again, its built-in cutter will start and cut off the packing belt cleanly. Then, you can remove the tensioner from the belt. Here, a bundle is done.
Using A Semi-Automatic (Bench-Top) Strapping Machine
Of course, if your packing quantity comes up, it is not a matter to always operate manually. The semi-automatic baler automates the steps of tensioning, hot melt bonding and cutting, and the efficiency is not an order of magnitude at all.
First of all, safety issues are still the same. Wearing gloves and goggles is the basic requirement before operating the machine.
Step 1: Boot Preheating
Turn on the power switch of the machine. It takes one to two minutes for the internal heating element to reach the right temperature so that the packing tape can be pressed firmly. Most machines have an indicator light. If the light is on or changes color, it means it is ready. Many novices skip this step in order to save trouble, and the result is that the bonding is not firm.
Step 2: Prepare The Packing Belt
Check that the packing tape roll is correctly loaded on the machine tray. Then press the “Feed” button on the control panel, the machine will automatically send a preset length of tape.
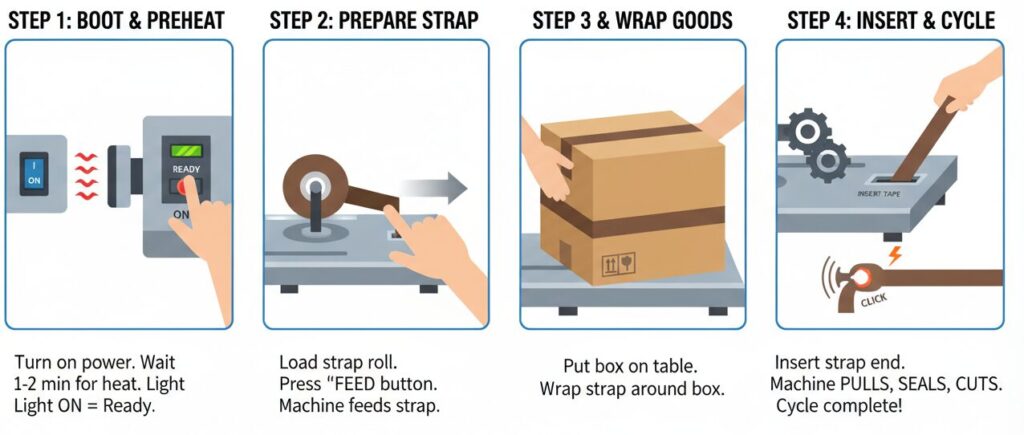
Step 3: Place And Wrap The Goods
Put your boxes or goods on the machine table. Pick up the head of the packing belt sent by the machine and go up around the whole cargo.
Step 4: Insert The Packing Tape And Start The Cycle
Insert the head of the packing tape into the designated tape inlet or slot on the countertop. This action directly triggers the automatic working cycle of the machine. You will hear the sound of the machine starting, it will automatically pull the tape to the preset tension, use hot melt to glue the two ends together to form a very firm interface, and then “click” cut off. When the sound of the machine stops, the whole cycle ends. You can take the bundled package away now.
Author:Leo
“With years of hands-on experience in packaging and shipping, I’ve learned that a secure bundle starts with the right technique. I’ve operated both manual and semi-automatic strapping machines day in and day out, and I wrote this guide to share the simple, core actions—wrap, tension, seal, and cut—that have helped me get the job done safely and efficiently every single time.”